Heat welding is a fabrication process whereby two or more parts fuse using heat, pressure, or both, forming a joint as the parts cool. Heat welding is mainly used on metals and thermoplastics but can be used on wood. The completed welded joint is referred to as a weldment.
Some materials in heat welding require the use of specific techniques and processes. Many materials are considered unweldable, a term that’s descriptive and useful in engineering. The parts that are joined together during heat welding are known as parent materials. The material added to form the joint is called consumable or filler. These materials may see them referred to as parent plate, filler, pipe, or consumable electrode (for arc welding).
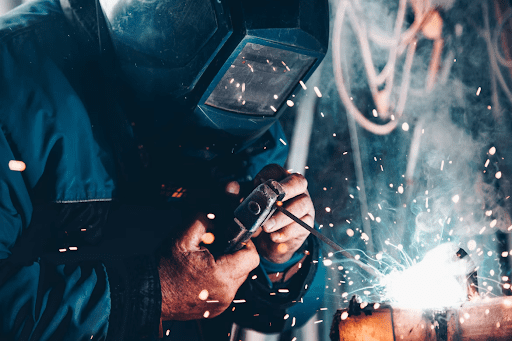
The main steps of heat welding include:
- Safety. The first step to consider while using any welder is safety. Not only is the electricity required for heat welding extremely hot, but it also generates dangerous UV rays that can damage your eyes if looked at directly.
- Gathering the necessary tools. Before you start welding, you’ll need to make sure you have all the tools required for the project at hand. The most common welding tools include safety glasses, welding masks, leather jackets, gloves, ear protection, pliers, wire brush, and chipping hammers.
- Cleaning your metal. Although FCAW is a process that gets away with welding dirty metal, it’s crucial to clean the part of the metal you need to weld; this is done with a wire brush or grinder with a wire wheel.
- Set up your workpiece. Once you have cleaned your metal thoroughly and cut it into appropriate dimensions, it’s time to get your workpiece set up so that you can tack-weld it together.
- Turn on the grinder and adjust settings. Adjusting the grinder to the appropriate dimensions is an essential part of your heat welding project. If your sheet metal is a fair thing gauge, you can weld on the lower settings using a lower wire speed.
- Track-weld the workpiece. After having everything lined up correctly and setting your welder to the appropriate settings, track-weld the corners of your workpiece.
- Fill up the remaining areas with bead welds. After fusing everything correctly, you can go back and fill the remaining seams with bead welds.
- Clean up your piece. After you’ve welded everything together and filled the remaining parts with bead welds, there’s going to be some slag leftover from this flux. Now it’s time to use the wire brush and chipping hammer to remove as much of this spatter as possible.
Contact Chaffee Roofing for any inquiries about heat welding solutions.